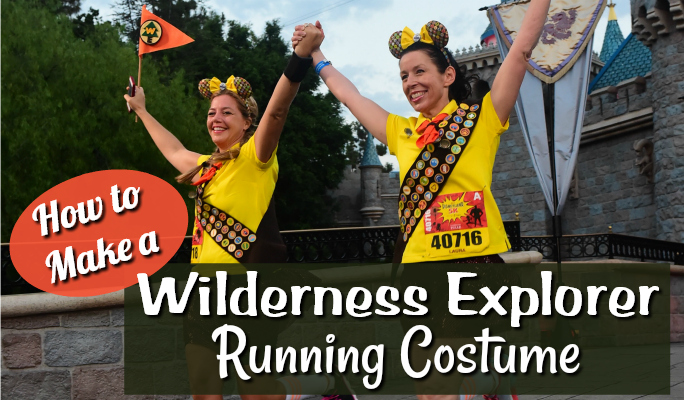
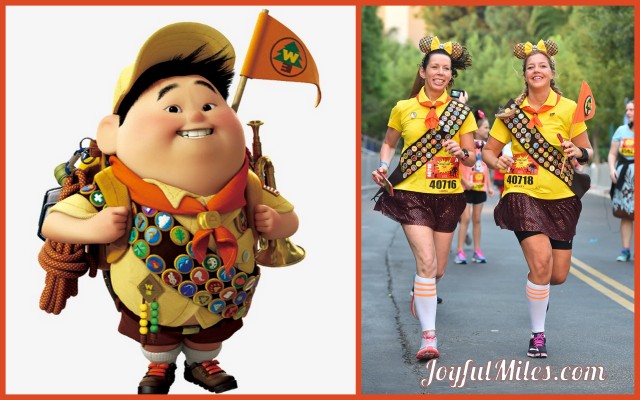
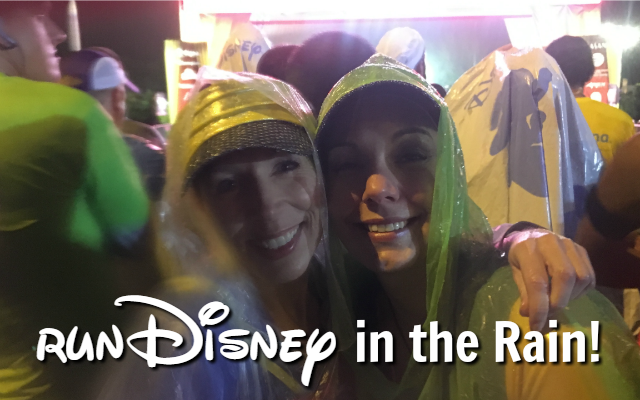
Hello, Russell fans, want to add some Up to your next runDisney event or other race? Awesome, we had so much fun as Wilderness Explorers, (2017 Disneyland 5k,) and you will, too! It’s time-consuming, but certainly worth the effort and it’s on our list of Top Ten runDisney Running Costumes!
So. I can’t help you cross the street. I can’t help you cross your yard or porch. But I can help you create a fun, colorful costume! Here’s everything we used for ours. (Directions and links below.) For better visuals, be sure to watch my Disneyland Costume Vlog!

All Amazon links are affiliate links. This doesn’t cost you extra but does give me a small commission.
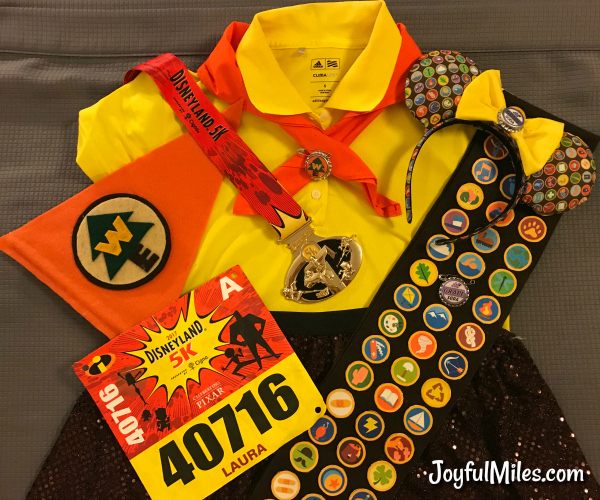
- Yellow top
- Brown Sparkle Athletic Running skirt
- White socks with orange stripes
- Wilderness Explorer Minnie Ears
- WE patch
- WE orange scarf
- WE banner
- WE Brown sash with buttons
- Grape Soda Pin
Yellow Top
A tank top would have been more comfortable, (especially since we had record-breaking temps during the race,) but we stuck with a polo shirt to better match Russell. We found one on Amazon that was pricier than expected but the perfect color and fit!

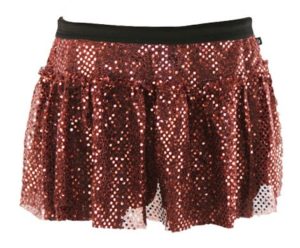
 Brown Running Skirt

Oh, how love our Sparkle Athletic skirts! The brown one was perfect. Make sure to sign up for their newsletter or follow them for sales announcements! (Some colors are available through Amazon Prime, but as of the writing of this post, not the brown ones.)
White socks with Orange Stripes
For us, buying compression socks for each costume can get pricey plus this outfit was for a 5k, so these tube socks worked great! We did but the feet off, though, in order to wear or regular running socks.
*Tip: Try the socks on and mark where you’d like them end, adding an extra inch because the cut end will roll up a bit. You can always trim off more!

WE Minnie Ears
Russell wears a yellow hat, but in keeping with our personal style, we went with Minnie Ears!
Jackey found these amazing ears on Etsy by sawdustandpixiedust and they’re our all-time favorite! The band is super comfy and they’re lightweight – perfect for running! (I wish she made more styles.)

Want a yellow hat? Here’s a nice one available on Amazon. This one is nice, too, although pricier.
Thinking about making your own? Watch my tutorial video or read this blog post!
WE Patch
Want to save some time? You can purchase a Wilderness Explorer Iron-On Patch through Amazon.
I don’t know why we didn’t … maybe it wasn’t available back then, maybe it wouldn’t have arrived on time but thankfully, ours were super easy to make! Here’s how:

Materials/Tools:
- Felt:
- Dark Brown
- Orange
- Hunter green
- Gold
- Glue gun
- Scissors
- Brown thread
Cut out a circle in the orange felt, (size depends on how large you want it,) and then layer over a larger brown felt circle. Add on a hunter green tree, a W in gold and E in dark brown as the tree’s trunk. Then attach to your shirt in a running stitch, using dark brown thread.
Now. Here’s where I’d like to include a photo of my badge, but I can’t find it which is amusing considering we also couldn’t find either of ours before the race. Jackey had accidentally placed them in her suitcase. I’ve since forgive her. 😉 Oh our poor cursed badges!
*Tip: If you do buy the iron-on, sew to your shirt instead so you can use it again for other running costumes!
WE Orange Scarf
Had I started making our costumes sooner, I would have saved myself a TON of time by ordering this scarf from Wal-Mart or this one from Amazon. But it wouldn’t have arrived in time so I had to make ours.
Materials:
- Orange material
- Orange thread
Because I wanted my scarf to roughly measure 22″ x 22″, I cut my material in a 23″ x 23″ square, leaving 1″ for the hemming. Hopefully you are a better seamstress than I am and have better results. If not? No worries, nobody will see your mistakes.
As for the tie, we simply used a brown hair elastic looped about three times. Very easy and it stayed put!
WE Banner
Since we had chosen to not add a backpack … we were running after all, I decided to make a banner that Jackey would hold seeing as how I film for video recaps. (Like this one for the Disneyland 5k in our costumes!)
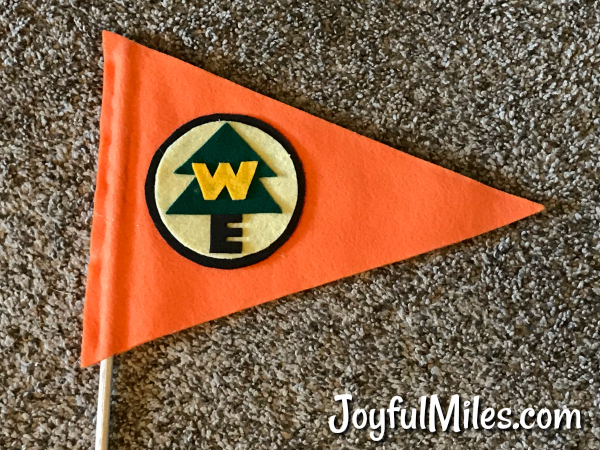
Materials:
- Wooden dowel (we used a 1/4″ one, trimmed to 20″ long)
- Two squares of orange felt
- Plastic for center
- Felt for patch
- Brown
- Beige
- Hunter green
- Gold
Cut two pieces of the orange felt in a banner shape. (If you like my dimensions, I went with 9.25″ x 12.5″ along the long side.) To keep your banner from flopping, strengthen the orange felt with some kind of stabilizer material. I used a plastic folder from the recycle bin, but card stock, poster board or thin cardboard would do the trick.
Trim the stabilizer about a half-inch smaller than the long sides of the banner, leaving roughly 1.5″ on the short end where you’ll glue the dowel. Glue along each long side, leaving short side unglued. Then place the dowel between the felt on the short side and glue away, being careful to get all sides of the dowel!
For the logo, I followed the same pattern and dimensions as the badge, using a beige as the main background color insted of orange so it would stand out better on the banner.
WE Sash
Oh boy. I saved the tough one for last!
First off, major thanks to the Make Life Lovely and Live Like You Are Rich blogs which gave me the foundation for our sashes! I made some modifications to their tutorials to make it more runner friendly, plus be more in-keeping with personal preferences.
Now, if you can sew and you’re looking to save some time, you can buy badge print material. That wasn’t an option for us since 1.) I can barely sew, 2.) I wanted the badges to be 3-Dimensional, and 3.) it would be hard to contor the material for a flat fit. So we went with handmade ones!
Materials:
- Spare felt (if you’d like to use as a pattern)
- Dark Brown Felt
- Dark Brown thread
- Badges (I printed mine on white cardstock using this image, many thanks allthingspixar.)
- Mod Podge (I used Matte)
- Yellow Craft foam
- Scissors
- Foam brush
- Spray acrylic sealer
- Glue gun
First off, print a set of badges onto thick white cardstock paper. Cut out each badge, being careful to keep them in the same order!
To save time, I cut the yellow craft foam into strips that were wide enough for the badges, plus some cutting room. I then used the craft foam brush to apply a strip of mod podge to the craft foam, making it long enough for about 4-5 badges. Quickly press down the badges onto the wet mod podge and allow to dry. (For a visual, watch my Disneyland Costume Vlog below or using this link.)
Now, the one blog tutorial called for mod podge to be brushed on top of the badges in order to protect and seal. (Which is very important if it rains during your race or is very humid!) After testing some scrap badges, however, I didn’t like how it gave texture to the top plus a shine despite using matte mod podge. So instead, I placed the strips onto a large piece of cardboard, took it outside and then sprayed them with a coat of acrylic sealer. Much better! Once dry, cut out each badge, being careful to keep them in order.
Next up, the sash! You could save time by purchasing a Girl Scout Brownie Sash, (they sell extra long ones, too.) Perhaps that would have been a better option for us, but ours turned out really cute. No regrets!
Because I wanted the sash to curve with my body rather than gaping, I first made a template out of spare felt, cutting and curving until I was happy with the shape. (Mine ended up being 4.75″ wide.) I then folded the template in half, placed it over a folded piece of dark brown felt and marked where to cut, leaving plenty of room at the bottom to see how long to make it.
Next was a lot of pinning and rearranging until I was happy with the fit! (Be sure to wear the sash the correct way, going from your left shoulder to your right hip. Don’t make the same mistake as I did by using the reflection in my mirror!) To keep the sash smooth along my hip, I crossed the bottom two pieces and then trimmed so it was in the shape of a V, using running stitches with brown thread to attach.

Time to glue! While wearing your sash, test out where you’d like the first row to start and how far apart to glue them. Mark the locations with pins or a chalk pencil. Then put that glue gun to work by attaching each badge, being careful to leave room for the Grape Soda pin!
Oh, and speaking of Grape Soda pins, Jackey found this adorable one on Etsy by Clayfully Yours!
Now all that’s left for you to do is learn the official Wilderness Explorer introduction! I’m hoping you can do a better job than we did.
Now, before wrapping things up, here’s some tips for making this costume more comfortable while running:
- To better stabalize the banner, we pinned it on our shouder underneath the orange necktie so the safety pin wouldn’t show. When adding the Grape Soda badge, we also pinned it through the shirt.
- If you wear ears, use bobby pins or hair clips on both sides to keep from moving.
- We attached our bibs to the side so the banner wouldn’t cover it and keep us from getting amazing Photopass pictures!
- We also skipped running belts and instead wore shorts with pockets to carry our necessities. Jackey is a big fan of Happy Puppies Athletic Wear and I love my Saucony Bullet shorts. (Unfortunately, they are out of black at the time of writing this post, but I also love these shorts that are inexpensive and comfortable!)
- And as I say in all my running costume tip posts, be sure to always attach a couple safety pins on your shoelaces for emergencies. They’ve gotten us out of many pickles!
So there you go, how I made our Wilderness Explorer Russell running costumes for a runDisney race. I hope this was helpful and please be sure to tag #joyfulmiles so we can see your costume!
Want more runDisney tips? We have tons of blog posts, podcast episodes and videos that you can find here. Or join our Joyful Miles Running Club and post your questions there!
And as always, thanks for reading and have a joyful day!


Hello! These are sooooo cute! You guys really went all out and did a fantastic job! I am making wilderness explorer flags this week and was wondering if you used Elmer’s white glue or hot glue? It might not matter but just curious. Thanks!
Glue gun! Mine is one of my best friends. 😉